|
System
|
System Info
|
Displays the System name, BIOS Version number, Service Tag, Express Service Code, and Asset Tag.
NOTE: The system name listed in the BIOS may not appear exactly as the name that appears on the computer or in the computer's documentation.
|
Processor Info
|
Displays the following information for the processor installed in the system: Processor Type, Processor Clock Speed, Processor Bus Speed, Processor Cache Size, Processor ID number, whether the processor is Hyperthreading or Multiple Core Capable, and if the processor has 64-bit Technology.
|
Memory Info
|
Displays the amount of Installed Memory, Memory Speed, Memory Channel Mode, and a description of the Memory Technology. This option also displays a table that describes the memory size, whether the memory module is ECC capable, single or dual rank, type, and organization.
|
PCI Info
|
Displays the contents of each PCI slot.
|
Date/Time
|
Controls the system's internal calendar and clock.
|
Boot Sequence
|
Determines the order in which the system searches for boot devices during system startup.
NOTE: If you insert a boot device and restart the computer, this option appears in the system setup menu. To boot from a USB memory device, select the USB device and move it so it becomes the first device in the list.
|
|
Drives
|
|
Diskette Drive
|
Enables and disables the floppy drives and sets read permission for the internal floppy drive. Off disables all floppy drives. USB enables the USB floppy drive. Internal (the default setting) enables the internal floppy drive. Read Only enables the internal drive controller and allows the internal floppy drive read-only permission.
NOTE: Operating systems with USB support will recognize USB floppy drives regardless of this setting.
|
|
SATA Drives 0 through 3
|
Enables or disables a SATA device (such as a hard-drive). On (the default setting) enables the interface so that the device can be used.
Displays the Controller type (SATA), Port number the drive is using, Drive ID number, Capacity, Link Speed, and whether the drive is controlled by the BIOS.
|
|
PATA Drives 0 through 1
|
Enables or disables an ATA device (such as a CD or DVD drive). On (the default setting) enables the interface so that the device can be used.
Displays the Controller type (ATA), Port number the drive is using, Drive ID number, Capacity, Link Speed, and whether the drive is controlled by the BIOS.
|
|
SATA Operation
|
Determines the integrated SATA controller's operating mode:
RAID Autodetect/ AHCI (the default setting) – RAID if the drives are signed, otherwise AHCI
RAID Autodetect/ ATA – RAID if the drives are signed, otherwise ATA
RAID On – SATA is configured for RAID on every boot.
|
|
Onboard Devices
|
|
Integrated NIC Controller
|
You can set the NIC to On (default), Off, or On w/ PXE. When the On w/ PXE setting is active (available only for the future boot process), the computer prompts you to press <Ctrl><Alt><b>. Pressing this key combination causes a menu to display that allows you to select a method for booting from a network server. If a boot routine is not available from the network server, the computer attempts to boot from the next device in the boot sequence list.
|
|
Integrated Audio Controller
|
Enables or disables the onboard audio controller.
|
|
USB Controller
|
Set to On (default) so that USB devices will be detected and supported in the operating system.
|
|
USB for FlexBay
|
This field enables and disables the internal USB for FlexBay.
Off = Internal USB for FlexBay is disabled.
On = Internal USB for FlexBay is enabled.
No Boot = Internal USB for FlexBay is enabled but not bootable.
The factory default setting is No Boot.
NOTE: This USB option appears only if a FlexBay device is installed.
|
|
Video
|
|
Primary Video
|
This setting specifies which video controller is primary, PCI or PEG.
NOTE: This only applies to a PCI video controller installed in the 32-bit, 33 MHz, PCI expansion slot. Settings are reversed if a PCI video controller is installed in a 64-bit PCIx expansion slot.
|
|
Performance
|
|
Multiple CPU Core
|
This setting specifies whether more than one core is enabled. The performance of some applications may improve with an additional core enabled. The default is On (second core enabled).
|
|
SpeedStep
|
If applicable, Intel SpeedStep® appears in the Options List under Performance.
|
|
HyperThreading
|
If your computer processor supports Hyper-Threading, this option appears in the Options List (defaults to On).
|
|
HDD Acoustic Mode
|
- Bypass (default) — Your computer does not test or change the current acoustics mode setting.
- Quiet — The hard drive operates at its most quiet setting.
- Suggested — The hard drive operates at the level suggested by the drive manufacturer.
- Performance — The hard drive operates at its maximum speed.
NOTE: Switching to performance mode will cause the drive heads to move faster, causing the hard drive to be noisier. However, some drives may not see an increase in data transfer rates.
NOTE: Changing the acoustics setting does not alter your hard drive image.
|
|
Security
|
This section displays available system security options.
|
|
Admin Password
|
Displays the current status of the system setup password security feature and allows a new system setup password to be assigned and verified.
|
|
System Password
|
Displays the current status of the system's password security feature and allows a new system password to be assigned and verified.
|
|
Password Changes
|
This option locks the system password field with the setup password. When the field is locked, you can no longer disable password security by pressing <Ctrl><Enter> when the computer starts. Also, a valid Admin password is required to change the system password (defaults to Unlocked).
|
|
Execute Disable
|
Enables or disables Execute Disable memory protection technology. On is the default setting.
|
|
Power Management
|
|
AC Recovery
|
Determines what happens when AC power is restored to the computer. On restarts the computer when power is restored after an outage. Last returns the computer to its last state before power was removed. Off is the default setting.
|
|
Auto Power On
|
Sets the computer to automatically turn on. Choices are every day or every Monday through Friday.
The default setting is Off.
This feature does not work if you turn off your computer using a power strip or surge protector.
|
|
Auto Power Time
|
Sets time to automatically turn on the computer.
Time is kept in the standard 12-hour format (hours:minutes). Change the startup time by pressing the right- or left-arrow key to increase or decrease the numbers, or type numbers in both the date and time fields.
This feature does not work if you turn off your computer using a power strip or surge protector.
|
|
Suspend Mode
|
The options are S1, a suspend state where the computer is running in a low-power mode, and S3, a standby state where the power is reduced or turned off for most components, however, system memory remains active.
|
|
Maintenance
|
|
SERR DMI Message
|
Some graphics cards require that the SERR DMI message be disabled. The default setting is On.
|
|
Asset Tag
|
Displays the system asset tag.
|
|
Owner Tag
|
Displays the system owner tag.
|
|
Load Defaults
|
When Continue is selected, this setting restores the computer's default settings. The default setting is Cancel.
|
|
Event Log
|
Displays the system event log.
|
|
POST Behavior
|
|
Fastboot
|
When set to On (default), your computer starts more quickly because it skips certain configurations and tests.
|
|
Numlock Key
|
This option involves the rightmost bank of keys on your keyboard. When set to On (default), this option activates the numeric and mathematical features shown at the top of each key. When set to Off, this option activates the cursor-control functions labeled on the bottom of each key.
|
|
POST Hotkeys
|
This option allows you to specify the function keys to display on the screen when the computer starts.
|
|
Keyboard Errors
|
This option enables or disables keyboard error reporting when the computer starts.
|
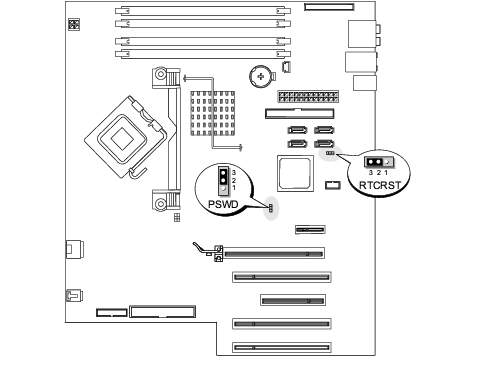
 Clearing Forgotten Passwords