Nov 8, 2002
onlsbc1: コンパクトフラッシュ上のLinuxシステムの読み出し専用化
--- RAMディスク #2
~~~~~~~~~~~~~~~~~~~~~~~~~~~~~~~~~~~~~~~~~~~~~~~~~~
(http://www-online.kek.jp/~inoue/para-CAMAC/
Work/SBC-RAM2.html)
高エネルギー加速器研究機構
素粒子原子核研究所
物理、オンライングループ
井上 栄二
目的
並列CAMACで使用するSBC上のLinuxシステムを、コンパクトフラッシュ上に
構築した。 コンパクトフラッシュ上に、現在構築してあるLinuxシステムは
通常のシステムと同じで、システムはコンパクトフラッシュに対して読み
書きを行っている。 ここで注意すべきことは、コンパクトフラッシュには
構造上書き込み回数に限界があるという点である。 したがって、コンパク
トフラッシュ上のシステムは、読み出し専用として構築するのが望ましい。
読み出し専用化システムの構築作業をするために、256MBのコンパクトフ
ラッシュ上Linuxシステムを構築した。 このコンパクトフラッシュを使っ
て読み出し専用化システムを構築する。
(1). 方針
(2). /etc/rc.d/rc.sysinit の調査
(3). /etc/rc.d/rc.sysinit の修正
(4). ブートテスト
--------------------------------------------------------------------
(1). 方針
コンパクトフラッシュは書き込み回数に限界があるので読み出し専用として使用
するのが望ましい。 ここでは、コンパクトフラッシュを読み出し専用化する
ために、/var、/tmp、/etcなどのRAMディスク化について検討する。 テストでは
256MBのコンパクトフラッシュを使う。 /etc/rc.d下のスクリプト、rc.sysinit
を修正してRAMディスク化の処理を行う。
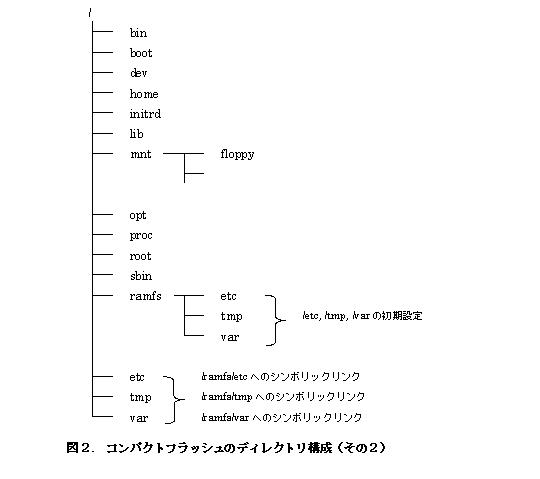
(1-1). コンパクトフラッシュ上のファイル構成
./SBC-RAM1.html で処理後の、現在の /ディレクトリ構成は次のとおり。
[root@onlsbc1 mnt1]# df -k
Filesystem 1k-blocks Used Available Use% Mounted on
/dev/hda2 7360792 2217228 4769652 32% /
/dev/hda5 10475668 159388 9784132 2% /home
none 152332 0 152332 0% /dev/shm
/dev/hdc1 241949 223070 6387 98% /mnt1
[root@onlsbc1 mnt1]# pwd
/mnt1
[root@onlsbc1 mnt1]# ls -l
合計 113
drwxr-xr-x 2 root root 2048 10月 24 22:53 bin
drwxr-xr-x 3 root root 1024 10月 29 09:50 boot
drwxr-xr-x 18 root root 82944 10月 30 15:45 dev
lrwxrwxrwx 1 root root 9 10月 28 15:22 etc -> ramfs/etc
drwxr-xr-x 4 root root 1024 10月 24 23:02 home
drwxr-xr-x 2 root root 1024 6月 22 2001 initrd
drwxr-xr-x 6 root root 3072 10月 24 22:58 lib
drwx------ 2 root root 12288 10月 24 22:28 lost+found
drwxr-xr-x 3 root root 1024 10月 24 14:07 mnt
drwxr-xr-x 2 root root 1024 10月 24 15:15 mnt1
drwxr-xr-x 2 root root 1024 10月 24 16:21 mnt2
drwxr-xr-x 2 root root 1024 8月 24 1999 opt
drwxr-xr-x 2 root root 1024 10月 24 22:28 proc
drwxr-xr-x 5 root root 1024 10月 28 15:21 ramfs
drwxr-x--- 2 root root 1024 10月 24 14:26 root
drwxr-xr-x 2 root root 3072 10月 24 22:57 sbin
lrwxrwxrwx 1 root root 9 10月 28 15:22 tmp -> ramfs/tmp
drwxr-xr-x 15 root root 1024 10月 24 22:50 usr
lrwxrwxrwx 1 root root 9 10月 28 15:22 var -> ramfs/var
[root@onlsbc1 mnt1]#
(1-2). コンパクトフラッシュ上のファイル構成の変更
/etc/rc.d/rc.sysinitファイルの中で、RAMディスク構築の作業を行うので、
initrd実行後には /etc下のディレクトリ構造は存在していなければならない。
図2の構成に変更する。
 (1-2-1). /mnt1/mnt/ramfsディレクトリ以下を削除
[root@onlsbc1 mnt1]# rmdir /mnt1/mnt/ramfs
[root@onlsbc1 mnt1]#
(1-2-2). /mnt1/etc、/mnt1/tmp、/mnt1/varシンボリックリンクの変更
[root@onlsbc1 mnt1]# pwd
/mnt1
[root@onlsbc1 mnt1]# ls -l
合計 113
drwxr-xr-x 2 root root 2048 10月 24 22:53 bin
drwxr-xr-x 3 root root 1024 10月 29 09:50 boot
drwxr-xr-x 18 root root 82944 10月 30 15:45 dev
lrwxrwxrwx 1 root root 9 10月 28 15:22 etc -> ramfs/etc
drwxr-xr-x 4 root root 1024 10月 24 23:02 home
drwxr-xr-x 2 root root 1024 6月 22 2001 initrd
drwxr-xr-x 6 root root 3072 10月 24 22:58 lib
drwx------ 2 root root 12288 10月 24 22:28 lost+found
drwxr-xr-x 3 root root 1024 10月 31 17:20 mnt
drwxr-xr-x 2 root root 1024 10月 24 15:15 mnt1
drwxr-xr-x 2 root root 1024 10月 24 16:21 mnt2
drwxr-xr-x 2 root root 1024 8月 24 1999 opt
drwxr-xr-x 2 root root 1024 10月 24 22:28 proc
drwxr-xr-x 5 root root 1024 10月 28 15:21 ramfs
drwxr-x--- 2 root root 1024 10月 24 14:26 root
drwxr-xr-x 2 root root 3072 10月 24 22:57 sbin
lrwxrwxrwx 1 root root 9 10月 28 15:22 tmp -> ramfs/tmp
drwxr-xr-x 15 root root 1024 10月 24 22:50 usr
lrwxrwxrwx 1 root root 9 10月 28 15:22 var -> ramfs/var
[root@onlsbc1 mnt1]#
すでにramfs下にシンボリックリンクされている。
(1-3). RAMディスク化のための操作手順
RAMディスク化のためのコマンドは /mnt1/etc/rc.d/rc.sysinitファイルの中に
追記する。 ここで行う操作は、
(1). RAMディスクを初期化する。
(2). /mnt1/ramfs下のファイルをRAMディスクにコピーする。
(3). RAMディスクを /ramfsにマウントする。
である。
(1-4). カーネルパラメータについてのチェック
RAMディスク用に確保すべきサイズを調べる。
[root@onlsbc1 ramfs]# pwd
/mnt1/ramfs
[root@onlsbc1 ramfs]# ls -l
合計 5
drwxr-xr-x 31 root root 3072 10月 30 15:45 etc
drwxrwxrwt 3 root root 1024 10月 30 15:37 tmp
drwxr-xr-x 16 root root 1024 10月 24 22:58 var
[root@onlsbc1 ramfs]# du -k
121 ./etc/sysconfig/network-scripts
1 ./etc/sysconfig/console
1 ./etc/sysconfig/networking/devices
:
261 ./var/www
23145 ./var
28286 .
[root@onlsbc1 ramfs]#
ramfs下の etc、tmp、varを収めるRAMディスクのサイズは約28.3MB必要である。
カーネルが作成できるRAMディスクの最大サイズは、標準では4MBである。
Red Hat Linux ディストリビューションで採用されているカーネル組み込み型の
ドライバの場合は、カーネル起動時に "ramdisk_size=32" のようにオプション
を渡せば、最大サイズを変更できる。 この例では32MBの最大サイズに変更した
ことになる。
チェック:
2.5"IDEハードディスク上のLinuxシステムを、"ramdisk_size=32"のオプション
で起動し直して、RAMディスクのサイズを確かめてみる。 /boot/grub/grub.conf
に項目を追加した。
[root@onlsbc1 inoue]# cat /boot/grub/grub.conf
# grub.conf generated by anaconda
#
# Note that you do not have to rerun grub after making changes to this file
# NOTICE: You do not have a /boot partition. This means that
# all kernel and initrd paths are relative to /, eg.
# root (hd0,1)
# kernel /boot/vmlinuz-version ro root=/dev/hda2
# initrd /boot/initrd-version.img
#boot=/dev/hda
default=1
timeout=10
splashimage=(hd0,1)/boot/grub/splash.xpm.gz
title Red Hat Linux (2.4.18-3custom-Oct7-2002)
# root (hd0,1)
root (hd0,0)
# kernel /boot/vmlinuz-2.4.18-3custom-Oct7-2002 ro root=/dev/hda2
kernel /boot/vmlinuz-2.4.18-3custom-Oct7-2002 ro root=/dev/hda1
initrd /boot/initrd-2.4.18-3custom-Oct7-2002.img
title Red Hat Linux 7.3 (2.4.18-3)
root (hd0,1)
kernel /boot/vmlinuz-2.4.18-3 ro root=/dev/hda2
initrd /boot/initrd-2.4.18-3.img
title Testing Step #1: Go to /dev/hda1
root (hd0,0)
makeactive
chainloader +1
title Compact Flash Red Hat Linux (2.4.18-3)
root (hd1,0)
kernel /boot/vmlinuz-2.4.18-3 ro root=/dev/hdc1
initrd /boot/initrd-2.4.18-3.img
title RAM SIZE=32MB, Red Hat Linux 7.3 (2.4.18-3)
root (hd0,1)
kernel /boot/vmlinuz-2.4.18-3 ro root=/dev/hda2 ramdisk_size=32768
initrd /boot/initrd-2.4.18-3.img
[root@onlsbc1 inoue]#
システムをリブートする。 RAMディスクを作成する。
[root@onlsbc1 inoue]# /sbin/mke2fs /dev/ram0 32768
mke2fs 1.27 (8-Mar-2002)
Filesystem label=
OS type: Linux
Block size=1024 (log=0)
Fragment size=1024 (log=0)
8192 inodes, 32768 blocks
1638 blocks (5.00%) reserved for the super user
First data block=1
4 block groups
8192 blocks per group, 8192 fragments per group
2048 inodes per group
Superblock backups stored on blocks:
8193, 24577
Writing inode tables: done
Writing superblocks and filesystem accounting information: done
This filesystem will be automatically checked every 32 mounts or
180 days, whichever comes first. Use tune2fs -c or -i to override.
[root@onlsbc1 inoue]#
[root@onlsbc1 inoue]# mount -n -o rw /dev/ram0 /mnt2
[root@onlsbc1 inoue]# df -k
Filesystem 1k-blocks Used Available Use% Mounted on
/dev/hda2 7360792 2216812 4770068 32% /
/dev/hda5 10475668 159416 9784104 2% /home
none 152332 0 152332 0% /dev/shm
/dev/hdc1 241949 223070 6387 98% /mnt1
[root@onlsbc1 inoue]# ls -l /mnt2
合計 12
drwx------ 2 root root 12288 10月 31 14:16 lost+found
[root@onlsbc1 inoue]#
[root@onlsbc1 inoue]# cd /mnt1
[root@onlsbc1 mnt1]# ls -l
合計 113
drwxr-xr-x 2 root root 2048 10月 24 22:53 bin
drwxr-xr-x 3 root root 1024 10月 29 09:50 boot
drwxr-xr-x 18 root root 82944 10月 30 15:45 dev
lrwxrwxrwx 1 root root 9 10月 28 15:22 etc -> ramfs/etc
drwxr-xr-x 4 root root 1024 10月 24 23:02 home
drwxr-xr-x 2 root root 1024 6月 22 2001 initrd
drwxr-xr-x 6 root root 3072 10月 24 22:58 lib
drwx------ 2 root root 12288 10月 24 22:28 lost+found
drwxr-xr-x 3 root root 1024 10月 24 14:07 mnt
drwxr-xr-x 2 root root 1024 10月 24 15:15 mnt1
drwxr-xr-x 2 root root 1024 10月 24 16:21 mnt2
drwxr-xr-x 2 root root 1024 8月 24 1999 opt
drwxr-xr-x 2 root root 1024 10月 24 22:28 proc
drwxr-xr-x 5 root root 1024 10月 28 15:21 ramfs
drwxr-x--- 2 root root 1024 10月 24 14:26 root
drwxr-xr-x 2 root root 3072 10月 24 22:57 sbin
lrwxrwxrwx 1 root root 9 10月 28 15:22 tmp -> ramfs/tmp
drwxr-xr-x 15 root root 1024 10月 24 22:50 usr
lrwxrwxrwx 1 root root 9 10月 28 15:22 var -> ramfs/var
[root@onlsbc1 mnt1]# cp -ar ramfs /mnt2
cp: cannot open `ramfs/tmp/.kon1' for reading: そのようなデバイスやアドレスはあ
りません
[root@onlsbc1 mnt1]# cd /mnt2
[root@onlsbc1 mnt2]# ls -l
合計 13
drwx------ 2 root root 12288 10月 31 14:16 lost+found
drwxr-xr-x 5 root root 1024 10月 28 15:21 ramfs
[root@onlsbc1 mnt2]# du -k
12 ./lost+found
121 ./ramfs/etc/sysconfig/network-scripts
1 ./ramfs/etc/sysconfig/console
1 ./ramfs/etc/sysconfig/networking/devices
:
261 ./ramfs/var/www
23146 ./ramfs/var
28287 ./ramfs
28300 .
[root@onlsbc1 mnt2]#
ok. 28.3MBのファイルをRAMディスクに書き込むことができた。
(1-5). /mnt1/boot/grub/grub.confファイルの修正
コンパクトフラッシュ上のLinuxシステムを起動する際のカーネルパラメータを
修正して、32MBまでのRAMディスクを作成できるようにする。
[root@onlsbc1 grub]# pwd
/mnt1/boot/grub
[root@onlsbc1 grub]# ls
device.map ffs_stage1_5 menu.lst splash.xpm.gz vstafs_stage1_5
e2fs_stage1_5 grub.conf minix_stage1_5 stage1 xfs_stage1_5
fat_stage1_5 jfs_stage1_5 reiserfs_stage1_5 stage2
[root@onlsbc1 grub]# vi grub.conf
# grub.conf generated by anaconda
#
# Note that you do not have to rerun grub after making changes to this file
# NOTICE: You do not have a /boot partition. This means that
# all kernel and initrd paths are relative to /, eg.
# root (hd0,0)
# kernel /boot/vmlinuz-version ro root=/dev/hdc1
# initrd /boot/initrd-version.img
#boot=/dev/hdc
default=0
timeout=10
splashimage=(hd0,0)/boot/grub/splash.xpm.gz
title Red Hat Linux (2.4.18-3)
root (hd0,0)
kernel /boot/vmlinuz-2.4.18-3 ro root=/dev/hdc1
initrd /boot/initrd-2.4.18-3.img
title 32MB RAM Disk, Red Hat Linux (2.4.18-3)
root (hd0,0)
kernel /boot/vmlinuz-2.4.18-3 ro root=/dev/hdc1 ramdisk_size=32768
initrd /boot/initrd-2.4.18-3.img
~
"grub.conf" 22L, 755C written
[root@onlsbc1 grub]#
(1-6). /mnt1/ramfs/tmp下のファイルの再チェック
上記の項目(1-3)のチェック時にramfs/tmp下のファイルのサイズが気になった
ので各ファイルを再度チェックする。
各ファイルを再度チェックする。
[root@onlsbc1 ramfs]# pwd
/mnt1/ramfs
[root@onlsbc1 ramfs]# ls -lRa
.:
合計 7
drwxr-xr-x 5 root root 1024 10月 28 15:21 .
:
./tmp:
合計 3016
drwxrwxrwt 3 root root 1024 10月 30 15:37 .
drwxr-xr-x 5 root root 1024 10月 28 15:21 ..
drwxrwxrwx 2 bin bin 1024 10月 30 15:45 .iroha_unix
srwxrwxr-x 1 inoue inoue 0 10月 24 14:18 .kon1
-rw-r--r-- 1 root root 3072000 10月 24 15:18 initrd.tmp
./tmp/.iroha_unix:
合計 2
drwxrwxrwx 2 bin bin 1024 10月 30 15:45 .
drwxrwxrwt 3 root root 1024 10月 30 15:37 ..
:
[root@onlsbc1 ramfs]#
ramfs/tmp/initrd.tmpのファイルは削除する。
[root@onlsbc1 tmp]# pwd
/mnt1/ramfs/tmp
[root@onlsbc1 tmp]# ls -l
合計 3013
-rw-r--r-- 1 root root 3072000 10月 24 15:18 initrd.tmp
[root@onlsbc1 tmp]# rm initrd.tmp
rm: remove `initrd.tmp'? y
[root@onlsbc1 tmp]#
[root@onlsbc1 ramfs]# pwd
/mnt1/ramfs
[root@onlsbc1 ramfs]# du -k
261 ./var/www
23145 ./var
25273 .
[root@onlsbc1 ramfs]#
約25.3MBになった。
(2). /mnt1/etc/rc.d/rc.sysinit の調査
/mnt1/etc/rc.d/rc.sysinitファイルの内容をチェックする。
[inoue@onlsbc1 rc.d]$ df -k
Filesystem 1k-blocks Used Available Use% Mounted on
/dev/hda2 7360792 2218440 4768440 32% /
/dev/hda5 10475668 160120 9783400 2% /home
none 152332 0 152332 0% /dev/shm
/dev/hdc1 241949 220057 9400 96% /mnt1
[inoue@onlsbc1 rc.d]$ pwd
/mnt1/etc/rc.d
[inoue@onlsbc1 rc.d]$ ls
init.d rc.local rc0.d rc2.d rc4.d rc6.d
rc rc.sysinit rc1.d rc3.d rc5.d
[inoue@onlsbc1 rc.d]$
[inoue@onlsbc1 rc.d]$ vi rc.sysinit
#!/bin/bash
#
# /etc/rc.sysinit - run once at boot time
:
# Rerun ourselves through initlog
:
# If we're using devfs, start devfsd now - we need the old device names
:
# Set the path
:
# Read in config data.
:
# Source functions
:
# Print a banner. ;)
:
# Fix console loglevel
:
# Mount /proc (done here so volume labels can work with fsck)
:
# Unmount the initrd, if necessary
:
# Configure kernel parameters
:
# Set the system clock.
:
# Load keymap
:
# Load system font
:
# Start up swapping.
:
# Set the hostname.
:
# Initialize USB controller and HID devices
:
# Possibly update quotas if fsck was run on /.
:
# check for arguments passed from kernel
:
# set up pnp
:
# Remount the root filesystem read-write.
:
# LVM initialization
:
# Clear mtab
:
# Remove stale backups
:
# Enter root, /proc and (potentially) /proc/bus/usb and devfs into mtab.
:
# The root filesystem is now read-write, so we can now log via syslog() directly
:
# Our modutils don't support it anymore, so we might as well remove
# the preferred link.
:
# tweak isapnp settings if needed.
:
# Load sound modules iff they need persistent DMA buffers
:
# Load modules (for backward compatibility with VARs)
:
# Add raid devices
:
# LVM initialization, take 2 (it could be on top of RAID)
:
# Check filesystems
:
# Mount all other filesystems (except for NFS and /proc, which is already
# mounted). Contrary to standard usage,
# filesystems are NOT unmounted in single user mode.
:
# check remaining quotas other than root
:
# Configure machine if necessary.
:
# Clean out /etc.
:
# Do we need (w|u)tmpx files? We don't set them up, but the sysadmin might...
:
# Clean up /var
# I'd use find, but /usr may not be mounted.
:
# Reset pam_console permissions
:
# Clean up utmp/wtmp
:
# Delete X locks
:
# Delete VNC & X locks
:
# Delete Postgres sockets
:
# Now turn on swap in case we swap to files.
:
# Initialize the serial ports.
:
# If a SCSI tape has been detected, load the st module unconditionally
# since many SCSI tapes don't deal well with st being loaded and unloaded
:
# Load usb storage here, to match most other things
:
# If they asked for ide-scsi, load it
:
# Turn off DMA on CD-ROMs. It more often than not causes problems.
:
# Turn on harddisk optimization
# There is only one file /etc/sysconfig/harddisks for all disks
# after installing the hdparm-RPM. If you need different hdparm parameters
# for each of your disks, copy /etc/sysconfig/harddisks to
# /etc/sysconfig/harddiskhda (hdb, hdc...) and modify it.
# Each disk which has no special parameters will use the defaults.
# Each non-disk which has no special parameters will be ignored.
:
# Generate a header that defines the boot kernel.
:
# Adjust symlinks as necessary in /boot to keep system services from
# spewing messages about mismatched System maps and so on.
:
# The special Red Hat kernel library symlink must point to the right library
# We need to deal with cases where there is no library, and we need to
# deal with any version numbers that show up.
:
# Now that we have all of our basic modules loaded and the kernel going,
# let's dump the syslog ring somewhere so we can find it later
:
# Also keep kernel symbols around in case we need them for debugging
:
# create the crash indicator flag to warn on crashes, offer fsck with timeout
:
[inoue@onlsbc1 rc.d]$
(3). /mnt1/etc/rc.d/rc.sysinit の修正
rc.sysinitファイルの記述の中の以下の部分に、RAMディスク化のためのコマン
ドを追記する。
# Mount /proc (done here so volume labels can work with fsck)
:
<--- この部分にRAMディスク化のためのコマンドを追記
:
# Unmount the initrd, if necessary
[root@onlsbc1 rc.d]# pwd
/mnt1/etc/rc.d
[root@onlsbc1 rc.d]# ls -l
合計 36
drwxr-xr-x 2 root root 1024 10月 24 22:58 init.d
-rwxr-xr-x 1 root root 3108 9月 22 2001 rc
-rwxr-xr-x 1 root root 220 7月 11 2001 rc.local
-rwxr-xr-x 1 root root 22379 4月 19 2002 rc.sysinit
drwxr-xr-x 2 root root 1024 10月 24 22:58 rc0.d
drwxr-xr-x 2 root root 1024 10月 24 22:58 rc1.d
drwxr-xr-x 2 root root 1024 10月 24 22:58 rc2.d
drwxr-xr-x 2 root root 1024 10月 24 22:58 rc3.d
drwxr-xr-x 2 root root 1024 10月 24 22:58 rc4.d
drwxr-xr-x 2 root root 1024 10月 24 22:58 rc5.d
drwxr-xr-x 2 root root 1024 10月 24 22:58 rc6.d
[root@onlsbc1 rc.d]# vi rc.sysinit
:
# Mount /proc (done here so volume labels can work with fsck)
action $"Mounting proc filesystem: " mount -n -t proc /proc /proc
# <-- by E.Inoue : from here
/sbin/mke2fs -q /dev/ram0 32768
mount -n -o rw /dev/ram0 /mnt1
cp -ar /ramfs /mnt1
umount -n /mnt1
mount -n -o rw /dev/ram0 /ramfs
# --> to here
# Unmount the initrd, if necessary
:
"rc.sysinit" 789L, 22554C written
[root@onlsbc1 rc.d]#
(4). ブートテスト
コンパクトフラッシュ上のLinuxシステムを立ち上げてみる。
(4-1). 2.5"ハードディスクのMBR部の修正
[root@onlsbc1 grub]# pwd
/boot/grub
[root@onlsbc1 grub]# vi grub.conf
title RAM SIZE=32MB, Compact Flash Red Hat Linux (2.4.18-3)
root (hd1,0)
makeactive
chainloader +1
:
"grub.conf" 45L, 1399C written
[root@onlsbc1 grub]#
これで、2.5"ハードディスクのMBR部の grubから /dev/hdc1のコンパクト
フラッシュの grubへ制御を渡す。
(4-2). コンパクトフラッシュ上のLinuxシステムを立ち上げる
[root@onlsbc1 inoue]# reboot
MBR部のGRUBが起動し、以下のメニューが表示された。
|
V
RAM SIZE=32MB, Red Hat Linux 7.3 (2.4.18-3)
RAM SIZE=32MB, Compact Flash Red Hat Linux 7.3 (2.4.18-3) <-- この項目
を選択
|
V
/dev/hdc1部のGRUBが起動し、以下のメニューが表示された。
|
V
32MB RAM Disk, Red Hat Linux (2.4.18-3)<--- この項目を選択
|
V
ブート処理は進んで、INITが実行され以下の状況になった。
:
INIT: version 2.84 booting
Welcome to Red Hat Linux
Press 'I' to enter interactive startup
Mounting proc filesystem: [OK]
mke2fs 1.27 (8-Mar-2002)
cp: cannot create directory '/mnt1/ramfs': No space left on device
:
rc.sysinitスクリプトの中でこの段階では、/ はまだリードオンリーでマウント
されている。 したがって、/mnt1 にマウントしたRAMディスクも書き込みが
できない。 スクリプトのもっと後ろの方の、/ がリードライトで再マウント
された以降でRAMディスク化の作業をしないといけないようだ。 rc.sysinit
スクリプトを修正する。
(4-3). rc.sysinitスクリプトファイルの再修正
/ がリードライトで再マウントされた以降でRAMディスク化の作業をするように
修正する。
rc.sysinitファイルの記述の中の以下の部分に、RAMディスク化のためのコマン
ドを追記する。
# Mount all other filesystems (except for NFS and /proc, which is already
# mounted). Contrary to standard usage,
# filesystems are NOT unmounted in single user mode.
:
<--- この部分にRAMディスク化のためのコマンドを追記
:
# check remaining quotas other than root
[root@onlsbc1 rc.d]# pwd
/mnt1/etc/rc.d
[root@onlsbc1 rc.d]# ls
init.d rc.local rc0.d rc2.d rc4.d rc6.d
rc rc.sysinit rc1.d rc3.d rc5.d
[root@onlsbc1 rc.d]# vi rc.sysinit
:
# Remount the root filesystem read-write.
:
# Mount all other filesystems (except for NFS and /proc, which is already
# mounted). Contrary to standard usage,
# filesystems are NOT unmounted in single user mode.
action $"Mounting local filesystems: " mount -a -t nonfs,smbfs,ncpfs -O no_netde
v
# <-- by E.Inoue : from here
/sbin/mke2fs -q /dev/ram0 32768
#/sbin/mke2fs /dev/ram0 32768
#/sbin/mke2fs /dev/ram0 65536
mount -n -o rw /dev/ram0 /mnt1
#mount -n -o rw /dev/ram0 /mnt
#df -k
#ls -l /
#cp -ar /ramfs /mnt
cp -ar /ramfs /mnt1
#cp -ar ramfs /mnt
umount -n /mnt1
#umount -n /mnt
mount -n -o rw /dev/ram0 /ramfs
# --> to here
# check remaining quotas other than root
:
"rc.sysinit" 797L, 22718C written
[root@onlsbc1 rc.d]#
(4-4). コンパクトフラッシュ上のLinuxシステムを立ち上げる(その2)
[root@onlsbc1 inoue]# reboot
MBR部のGRUBが起動し、以下のメニューが表示された。
|
V
RAM SIZE=32MB, Red Hat Linux 7.3 (2.4.18-3)
RAM SIZE=32MB, Compact Flash Red Hat Linux 7.3 (2.4.18-3) <-- この項目
を選択
|
V
/dev/hdc1部のGRUBが起動し、以下のメニューが表示された。
|
V
32MB RAM Disk, Red Hat Linux (2.4.18-3)<--- この項目を選択
|
V
ブート処理は進んで、INITが実行され以下の状況になった。
:
INIT: version 2.84 booting
Welcome to Red Hat Linux
Press 'I' to enter interactive startup
Mounting proc filesystem: [OK]
mke2fs 1.27 (8-Mar-2002)
ramfsディレクトリからRAMディスクへのファイルのコピー、およびRAMディスク
を /ramfsへ再マウントは正常に終了した。 この直後の、
# check remaining quotas other than root
の部分で、/etc/fstabファイルが見つからないというエラーになった。
:
調べたところ、RAMディスクにコピーした後のディレクトリ構成が
/ramfs/ramfs/etc/fstab になってしまっていた。 これでは /ramfs/etc/fstab
ファイルは見つからないはずである。 rc.sysinitファイルを修正する。
[root@onlsbc1 rc.d]# vi rc.sysinit
:
cp -ar /ramfs/* /mnt1
:
[root@onlsbc1 rc.d]#
再度、システムを立ち上げる。
|
V
ブート処理は進んで、INITが実行され以下の状況になった。
:
INIT: version 2.84 booting
Welcome to Red Hat Linux
Press 'I' to enter interactive startup
Mounting proc filesystem: [OK]
mke2fs 1.27 (8-Mar-2002)
ramfsディレクトリからRAMディスクへのファイルのコピー、およびRAMディスク
を /ramfsへ再マウントは正常に終了した。 この直後の、
# check remaining quotas other than root
このの部分で表示されていた、/etc/fstabファイルが見つからないというエラー
は出なくなった。
:
Setting network parameters: [OK]
Bringing up loopback interface: execvp: No such file or directory
[FAILED]
Bringing up interface eth0: execvp: No such file or directory
[FAILED]
Starting system logger: [OK]
:
システムは立ち上がった。 コンソールからはログインしてシステムが使用でき
る。 ネットワークからはNG.
ここで一旦、システムをシャットダウンしてみる。
:
Turning off quotas: [OK]
Unmounting file system: umount2: Device or resource busy
umount: /ramfs: Illegal seek [FAILED]
INIT: no more process left in this runlevel
ここでフリーズする。 ALT-CTL-DELは利かない。 電源を切った。
(4-5). 問題点の処理
(A). システム立ち上げ時の問題点
loopback interface および eth0 interface の設定が正しくできて
いない。
(B). システム立ち下げ時の問題点
/ramfs のアンマウントが正しくできていない。
(4-5-1). システム立ち上げ時の問題点についての対策
再確認のために、RAMディスク化の処理をしていないコンパクトフラッシュの
Linuxシステムが正常に立ち上がれることを調べる。
/etc/rc.d/rc.sysinitファイルをオリジナルの状態に戻して、立ち上げてみる。
[root@onlsbc1 rc.d]# vi rc.sysinit
:
## <-- by E.Inoue : from here
#/sbin/mke2fs -q /dev/ram0 32768
##/sbin/mke2fs /dev/ram0 32768
##/sbin/mke2fs /dev/ram0 65536
#mount -n -o rw /dev/ram0 /mnt1
##mount -n -o rw /dev/ram0 /mnt
##df -k
##ls -l /
##cp -ar /ramfs /mnt
#cp -ar /ramfs/* /mnt1
#cp -ar ramfs /mnt
#echo -n $"Finished cp ar /ramfs /mnt1 and sleep 10 "
##sleep 10
#umount -n /mnt1
##umount -n /mnt
#echo -n $"Finished umount /mnt1 and sleep 10 "
##sleep 10
#mount -n -o rw /dev/ram0 /ramfs
#ls -l /ramfs
#ls -l /ramfs/etc/fstab
#echo -n $"Finished mount -n -o rw /dev/ram0 /ramfs and sleep 10 "
#sleep 10
## --> to here
:
"rc.sysinit" 817L, 23199C written
[root@onlsbc1 rc.d]#
システムをリブートする。
:
Setting network parameters: [OK]
Bringing up loopback interface: execvp: No such file or directory
[FAILED]
Bringing up interface eth0: execvp: No such file or directory
[FAILED]
Starting system logger: [OK]
:
RAMディスク化の処理をしていないのに、loopback interface、eth0 interface
設定が正常にできていない。 オリジナルのLinuxシステムを壊してしまった
ようだ。 コンソールからログインしてシャットダウンしてみる。
:
Shutting down system logger: [OK]
Shutting down loopback interface: execvp: No such file or directory
[FAILED]
Flushing all chains: [OK]
:
:
Flushing ide device: hda hdc
Power down
loopback interface のダウンでエラーだが他は問題ない。
念のために、カーネルオプションのRAMディスクサイズの指定もはずして起動し
てみたが、症状は変わらない。
256MBコンパクトフラッシュのLinuxシステムをインストールし直すことに
しよう。
(4-5-2). システム立ち下げ時の問題点についての対策
---xxxx
(1-2-1). /mnt1/mnt/ramfsディレクトリ以下を削除
[root@onlsbc1 mnt1]# rmdir /mnt1/mnt/ramfs
[root@onlsbc1 mnt1]#
(1-2-2). /mnt1/etc、/mnt1/tmp、/mnt1/varシンボリックリンクの変更
[root@onlsbc1 mnt1]# pwd
/mnt1
[root@onlsbc1 mnt1]# ls -l
合計 113
drwxr-xr-x 2 root root 2048 10月 24 22:53 bin
drwxr-xr-x 3 root root 1024 10月 29 09:50 boot
drwxr-xr-x 18 root root 82944 10月 30 15:45 dev
lrwxrwxrwx 1 root root 9 10月 28 15:22 etc -> ramfs/etc
drwxr-xr-x 4 root root 1024 10月 24 23:02 home
drwxr-xr-x 2 root root 1024 6月 22 2001 initrd
drwxr-xr-x 6 root root 3072 10月 24 22:58 lib
drwx------ 2 root root 12288 10月 24 22:28 lost+found
drwxr-xr-x 3 root root 1024 10月 31 17:20 mnt
drwxr-xr-x 2 root root 1024 10月 24 15:15 mnt1
drwxr-xr-x 2 root root 1024 10月 24 16:21 mnt2
drwxr-xr-x 2 root root 1024 8月 24 1999 opt
drwxr-xr-x 2 root root 1024 10月 24 22:28 proc
drwxr-xr-x 5 root root 1024 10月 28 15:21 ramfs
drwxr-x--- 2 root root 1024 10月 24 14:26 root
drwxr-xr-x 2 root root 3072 10月 24 22:57 sbin
lrwxrwxrwx 1 root root 9 10月 28 15:22 tmp -> ramfs/tmp
drwxr-xr-x 15 root root 1024 10月 24 22:50 usr
lrwxrwxrwx 1 root root 9 10月 28 15:22 var -> ramfs/var
[root@onlsbc1 mnt1]#
すでにramfs下にシンボリックリンクされている。
(1-3). RAMディスク化のための操作手順
RAMディスク化のためのコマンドは /mnt1/etc/rc.d/rc.sysinitファイルの中に
追記する。 ここで行う操作は、
(1). RAMディスクを初期化する。
(2). /mnt1/ramfs下のファイルをRAMディスクにコピーする。
(3). RAMディスクを /ramfsにマウントする。
である。
(1-4). カーネルパラメータについてのチェック
RAMディスク用に確保すべきサイズを調べる。
[root@onlsbc1 ramfs]# pwd
/mnt1/ramfs
[root@onlsbc1 ramfs]# ls -l
合計 5
drwxr-xr-x 31 root root 3072 10月 30 15:45 etc
drwxrwxrwt 3 root root 1024 10月 30 15:37 tmp
drwxr-xr-x 16 root root 1024 10月 24 22:58 var
[root@onlsbc1 ramfs]# du -k
121 ./etc/sysconfig/network-scripts
1 ./etc/sysconfig/console
1 ./etc/sysconfig/networking/devices
:
261 ./var/www
23145 ./var
28286 .
[root@onlsbc1 ramfs]#
ramfs下の etc、tmp、varを収めるRAMディスクのサイズは約28.3MB必要である。
カーネルが作成できるRAMディスクの最大サイズは、標準では4MBである。
Red Hat Linux ディストリビューションで採用されているカーネル組み込み型の
ドライバの場合は、カーネル起動時に "ramdisk_size=32" のようにオプション
を渡せば、最大サイズを変更できる。 この例では32MBの最大サイズに変更した
ことになる。
チェック:
2.5"IDEハードディスク上のLinuxシステムを、"ramdisk_size=32"のオプション
で起動し直して、RAMディスクのサイズを確かめてみる。 /boot/grub/grub.conf
に項目を追加した。
[root@onlsbc1 inoue]# cat /boot/grub/grub.conf
# grub.conf generated by anaconda
#
# Note that you do not have to rerun grub after making changes to this file
# NOTICE: You do not have a /boot partition. This means that
# all kernel and initrd paths are relative to /, eg.
# root (hd0,1)
# kernel /boot/vmlinuz-version ro root=/dev/hda2
# initrd /boot/initrd-version.img
#boot=/dev/hda
default=1
timeout=10
splashimage=(hd0,1)/boot/grub/splash.xpm.gz
title Red Hat Linux (2.4.18-3custom-Oct7-2002)
# root (hd0,1)
root (hd0,0)
# kernel /boot/vmlinuz-2.4.18-3custom-Oct7-2002 ro root=/dev/hda2
kernel /boot/vmlinuz-2.4.18-3custom-Oct7-2002 ro root=/dev/hda1
initrd /boot/initrd-2.4.18-3custom-Oct7-2002.img
title Red Hat Linux 7.3 (2.4.18-3)
root (hd0,1)
kernel /boot/vmlinuz-2.4.18-3 ro root=/dev/hda2
initrd /boot/initrd-2.4.18-3.img
title Testing Step #1: Go to /dev/hda1
root (hd0,0)
makeactive
chainloader +1
title Compact Flash Red Hat Linux (2.4.18-3)
root (hd1,0)
kernel /boot/vmlinuz-2.4.18-3 ro root=/dev/hdc1
initrd /boot/initrd-2.4.18-3.img
title RAM SIZE=32MB, Red Hat Linux 7.3 (2.4.18-3)
root (hd0,1)
kernel /boot/vmlinuz-2.4.18-3 ro root=/dev/hda2 ramdisk_size=32768
initrd /boot/initrd-2.4.18-3.img
[root@onlsbc1 inoue]#
システムをリブートする。 RAMディスクを作成する。
[root@onlsbc1 inoue]# /sbin/mke2fs /dev/ram0 32768
mke2fs 1.27 (8-Mar-2002)
Filesystem label=
OS type: Linux
Block size=1024 (log=0)
Fragment size=1024 (log=0)
8192 inodes, 32768 blocks
1638 blocks (5.00%) reserved for the super user
First data block=1
4 block groups
8192 blocks per group, 8192 fragments per group
2048 inodes per group
Superblock backups stored on blocks:
8193, 24577
Writing inode tables: done
Writing superblocks and filesystem accounting information: done
This filesystem will be automatically checked every 32 mounts or
180 days, whichever comes first. Use tune2fs -c or -i to override.
[root@onlsbc1 inoue]#
[root@onlsbc1 inoue]# mount -n -o rw /dev/ram0 /mnt2
[root@onlsbc1 inoue]# df -k
Filesystem 1k-blocks Used Available Use% Mounted on
/dev/hda2 7360792 2216812 4770068 32% /
/dev/hda5 10475668 159416 9784104 2% /home
none 152332 0 152332 0% /dev/shm
/dev/hdc1 241949 223070 6387 98% /mnt1
[root@onlsbc1 inoue]# ls -l /mnt2
合計 12
drwx------ 2 root root 12288 10月 31 14:16 lost+found
[root@onlsbc1 inoue]#
[root@onlsbc1 inoue]# cd /mnt1
[root@onlsbc1 mnt1]# ls -l
合計 113
drwxr-xr-x 2 root root 2048 10月 24 22:53 bin
drwxr-xr-x 3 root root 1024 10月 29 09:50 boot
drwxr-xr-x 18 root root 82944 10月 30 15:45 dev
lrwxrwxrwx 1 root root 9 10月 28 15:22 etc -> ramfs/etc
drwxr-xr-x 4 root root 1024 10月 24 23:02 home
drwxr-xr-x 2 root root 1024 6月 22 2001 initrd
drwxr-xr-x 6 root root 3072 10月 24 22:58 lib
drwx------ 2 root root 12288 10月 24 22:28 lost+found
drwxr-xr-x 3 root root 1024 10月 24 14:07 mnt
drwxr-xr-x 2 root root 1024 10月 24 15:15 mnt1
drwxr-xr-x 2 root root 1024 10月 24 16:21 mnt2
drwxr-xr-x 2 root root 1024 8月 24 1999 opt
drwxr-xr-x 2 root root 1024 10月 24 22:28 proc
drwxr-xr-x 5 root root 1024 10月 28 15:21 ramfs
drwxr-x--- 2 root root 1024 10月 24 14:26 root
drwxr-xr-x 2 root root 3072 10月 24 22:57 sbin
lrwxrwxrwx 1 root root 9 10月 28 15:22 tmp -> ramfs/tmp
drwxr-xr-x 15 root root 1024 10月 24 22:50 usr
lrwxrwxrwx 1 root root 9 10月 28 15:22 var -> ramfs/var
[root@onlsbc1 mnt1]# cp -ar ramfs /mnt2
cp: cannot open `ramfs/tmp/.kon1' for reading: そのようなデバイスやアドレスはあ
りません
[root@onlsbc1 mnt1]# cd /mnt2
[root@onlsbc1 mnt2]# ls -l
合計 13
drwx------ 2 root root 12288 10月 31 14:16 lost+found
drwxr-xr-x 5 root root 1024 10月 28 15:21 ramfs
[root@onlsbc1 mnt2]# du -k
12 ./lost+found
121 ./ramfs/etc/sysconfig/network-scripts
1 ./ramfs/etc/sysconfig/console
1 ./ramfs/etc/sysconfig/networking/devices
:
261 ./ramfs/var/www
23146 ./ramfs/var
28287 ./ramfs
28300 .
[root@onlsbc1 mnt2]#
ok. 28.3MBのファイルをRAMディスクに書き込むことができた。
(1-5). /mnt1/boot/grub/grub.confファイルの修正
コンパクトフラッシュ上のLinuxシステムを起動する際のカーネルパラメータを
修正して、32MBまでのRAMディスクを作成できるようにする。
[root@onlsbc1 grub]# pwd
/mnt1/boot/grub
[root@onlsbc1 grub]# ls
device.map ffs_stage1_5 menu.lst splash.xpm.gz vstafs_stage1_5
e2fs_stage1_5 grub.conf minix_stage1_5 stage1 xfs_stage1_5
fat_stage1_5 jfs_stage1_5 reiserfs_stage1_5 stage2
[root@onlsbc1 grub]# vi grub.conf
# grub.conf generated by anaconda
#
# Note that you do not have to rerun grub after making changes to this file
# NOTICE: You do not have a /boot partition. This means that
# all kernel and initrd paths are relative to /, eg.
# root (hd0,0)
# kernel /boot/vmlinuz-version ro root=/dev/hdc1
# initrd /boot/initrd-version.img
#boot=/dev/hdc
default=0
timeout=10
splashimage=(hd0,0)/boot/grub/splash.xpm.gz
title Red Hat Linux (2.4.18-3)
root (hd0,0)
kernel /boot/vmlinuz-2.4.18-3 ro root=/dev/hdc1
initrd /boot/initrd-2.4.18-3.img
title 32MB RAM Disk, Red Hat Linux (2.4.18-3)
root (hd0,0)
kernel /boot/vmlinuz-2.4.18-3 ro root=/dev/hdc1 ramdisk_size=32768
initrd /boot/initrd-2.4.18-3.img
~
"grub.conf" 22L, 755C written
[root@onlsbc1 grub]#
(1-6). /mnt1/ramfs/tmp下のファイルの再チェック
上記の項目(1-3)のチェック時にramfs/tmp下のファイルのサイズが気になった
ので各ファイルを再度チェックする。
各ファイルを再度チェックする。
[root@onlsbc1 ramfs]# pwd
/mnt1/ramfs
[root@onlsbc1 ramfs]# ls -lRa
.:
合計 7
drwxr-xr-x 5 root root 1024 10月 28 15:21 .
:
./tmp:
合計 3016
drwxrwxrwt 3 root root 1024 10月 30 15:37 .
drwxr-xr-x 5 root root 1024 10月 28 15:21 ..
drwxrwxrwx 2 bin bin 1024 10月 30 15:45 .iroha_unix
srwxrwxr-x 1 inoue inoue 0 10月 24 14:18 .kon1
-rw-r--r-- 1 root root 3072000 10月 24 15:18 initrd.tmp
./tmp/.iroha_unix:
合計 2
drwxrwxrwx 2 bin bin 1024 10月 30 15:45 .
drwxrwxrwt 3 root root 1024 10月 30 15:37 ..
:
[root@onlsbc1 ramfs]#
ramfs/tmp/initrd.tmpのファイルは削除する。
[root@onlsbc1 tmp]# pwd
/mnt1/ramfs/tmp
[root@onlsbc1 tmp]# ls -l
合計 3013
-rw-r--r-- 1 root root 3072000 10月 24 15:18 initrd.tmp
[root@onlsbc1 tmp]# rm initrd.tmp
rm: remove `initrd.tmp'? y
[root@onlsbc1 tmp]#
[root@onlsbc1 ramfs]# pwd
/mnt1/ramfs
[root@onlsbc1 ramfs]# du -k
261 ./var/www
23145 ./var
25273 .
[root@onlsbc1 ramfs]#
約25.3MBになった。
(2). /mnt1/etc/rc.d/rc.sysinit の調査
/mnt1/etc/rc.d/rc.sysinitファイルの内容をチェックする。
[inoue@onlsbc1 rc.d]$ df -k
Filesystem 1k-blocks Used Available Use% Mounted on
/dev/hda2 7360792 2218440 4768440 32% /
/dev/hda5 10475668 160120 9783400 2% /home
none 152332 0 152332 0% /dev/shm
/dev/hdc1 241949 220057 9400 96% /mnt1
[inoue@onlsbc1 rc.d]$ pwd
/mnt1/etc/rc.d
[inoue@onlsbc1 rc.d]$ ls
init.d rc.local rc0.d rc2.d rc4.d rc6.d
rc rc.sysinit rc1.d rc3.d rc5.d
[inoue@onlsbc1 rc.d]$
[inoue@onlsbc1 rc.d]$ vi rc.sysinit
#!/bin/bash
#
# /etc/rc.sysinit - run once at boot time
:
# Rerun ourselves through initlog
:
# If we're using devfs, start devfsd now - we need the old device names
:
# Set the path
:
# Read in config data.
:
# Source functions
:
# Print a banner. ;)
:
# Fix console loglevel
:
# Mount /proc (done here so volume labels can work with fsck)
:
# Unmount the initrd, if necessary
:
# Configure kernel parameters
:
# Set the system clock.
:
# Load keymap
:
# Load system font
:
# Start up swapping.
:
# Set the hostname.
:
# Initialize USB controller and HID devices
:
# Possibly update quotas if fsck was run on /.
:
# check for arguments passed from kernel
:
# set up pnp
:
# Remount the root filesystem read-write.
:
# LVM initialization
:
# Clear mtab
:
# Remove stale backups
:
# Enter root, /proc and (potentially) /proc/bus/usb and devfs into mtab.
:
# The root filesystem is now read-write, so we can now log via syslog() directly
:
# Our modutils don't support it anymore, so we might as well remove
# the preferred link.
:
# tweak isapnp settings if needed.
:
# Load sound modules iff they need persistent DMA buffers
:
# Load modules (for backward compatibility with VARs)
:
# Add raid devices
:
# LVM initialization, take 2 (it could be on top of RAID)
:
# Check filesystems
:
# Mount all other filesystems (except for NFS and /proc, which is already
# mounted). Contrary to standard usage,
# filesystems are NOT unmounted in single user mode.
:
# check remaining quotas other than root
:
# Configure machine if necessary.
:
# Clean out /etc.
:
# Do we need (w|u)tmpx files? We don't set them up, but the sysadmin might...
:
# Clean up /var
# I'd use find, but /usr may not be mounted.
:
# Reset pam_console permissions
:
# Clean up utmp/wtmp
:
# Delete X locks
:
# Delete VNC & X locks
:
# Delete Postgres sockets
:
# Now turn on swap in case we swap to files.
:
# Initialize the serial ports.
:
# If a SCSI tape has been detected, load the st module unconditionally
# since many SCSI tapes don't deal well with st being loaded and unloaded
:
# Load usb storage here, to match most other things
:
# If they asked for ide-scsi, load it
:
# Turn off DMA on CD-ROMs. It more often than not causes problems.
:
# Turn on harddisk optimization
# There is only one file /etc/sysconfig/harddisks for all disks
# after installing the hdparm-RPM. If you need different hdparm parameters
# for each of your disks, copy /etc/sysconfig/harddisks to
# /etc/sysconfig/harddiskhda (hdb, hdc...) and modify it.
# Each disk which has no special parameters will use the defaults.
# Each non-disk which has no special parameters will be ignored.
:
# Generate a header that defines the boot kernel.
:
# Adjust symlinks as necessary in /boot to keep system services from
# spewing messages about mismatched System maps and so on.
:
# The special Red Hat kernel library symlink must point to the right library
# We need to deal with cases where there is no library, and we need to
# deal with any version numbers that show up.
:
# Now that we have all of our basic modules loaded and the kernel going,
# let's dump the syslog ring somewhere so we can find it later
:
# Also keep kernel symbols around in case we need them for debugging
:
# create the crash indicator flag to warn on crashes, offer fsck with timeout
:
[inoue@onlsbc1 rc.d]$
(3). /mnt1/etc/rc.d/rc.sysinit の修正
rc.sysinitファイルの記述の中の以下の部分に、RAMディスク化のためのコマン
ドを追記する。
# Mount /proc (done here so volume labels can work with fsck)
:
<--- この部分にRAMディスク化のためのコマンドを追記
:
# Unmount the initrd, if necessary
[root@onlsbc1 rc.d]# pwd
/mnt1/etc/rc.d
[root@onlsbc1 rc.d]# ls -l
合計 36
drwxr-xr-x 2 root root 1024 10月 24 22:58 init.d
-rwxr-xr-x 1 root root 3108 9月 22 2001 rc
-rwxr-xr-x 1 root root 220 7月 11 2001 rc.local
-rwxr-xr-x 1 root root 22379 4月 19 2002 rc.sysinit
drwxr-xr-x 2 root root 1024 10月 24 22:58 rc0.d
drwxr-xr-x 2 root root 1024 10月 24 22:58 rc1.d
drwxr-xr-x 2 root root 1024 10月 24 22:58 rc2.d
drwxr-xr-x 2 root root 1024 10月 24 22:58 rc3.d
drwxr-xr-x 2 root root 1024 10月 24 22:58 rc4.d
drwxr-xr-x 2 root root 1024 10月 24 22:58 rc5.d
drwxr-xr-x 2 root root 1024 10月 24 22:58 rc6.d
[root@onlsbc1 rc.d]# vi rc.sysinit
:
# Mount /proc (done here so volume labels can work with fsck)
action $"Mounting proc filesystem: " mount -n -t proc /proc /proc
# <-- by E.Inoue : from here
/sbin/mke2fs -q /dev/ram0 32768
mount -n -o rw /dev/ram0 /mnt1
cp -ar /ramfs /mnt1
umount -n /mnt1
mount -n -o rw /dev/ram0 /ramfs
# --> to here
# Unmount the initrd, if necessary
:
"rc.sysinit" 789L, 22554C written
[root@onlsbc1 rc.d]#
(4). ブートテスト
コンパクトフラッシュ上のLinuxシステムを立ち上げてみる。
(4-1). 2.5"ハードディスクのMBR部の修正
[root@onlsbc1 grub]# pwd
/boot/grub
[root@onlsbc1 grub]# vi grub.conf
title RAM SIZE=32MB, Compact Flash Red Hat Linux (2.4.18-3)
root (hd1,0)
makeactive
chainloader +1
:
"grub.conf" 45L, 1399C written
[root@onlsbc1 grub]#
これで、2.5"ハードディスクのMBR部の grubから /dev/hdc1のコンパクト
フラッシュの grubへ制御を渡す。
(4-2). コンパクトフラッシュ上のLinuxシステムを立ち上げる
[root@onlsbc1 inoue]# reboot
MBR部のGRUBが起動し、以下のメニューが表示された。
|
V
RAM SIZE=32MB, Red Hat Linux 7.3 (2.4.18-3)
RAM SIZE=32MB, Compact Flash Red Hat Linux 7.3 (2.4.18-3) <-- この項目
を選択
|
V
/dev/hdc1部のGRUBが起動し、以下のメニューが表示された。
|
V
32MB RAM Disk, Red Hat Linux (2.4.18-3)<--- この項目を選択
|
V
ブート処理は進んで、INITが実行され以下の状況になった。
:
INIT: version 2.84 booting
Welcome to Red Hat Linux
Press 'I' to enter interactive startup
Mounting proc filesystem: [OK]
mke2fs 1.27 (8-Mar-2002)
cp: cannot create directory '/mnt1/ramfs': No space left on device
:
rc.sysinitスクリプトの中でこの段階では、/ はまだリードオンリーでマウント
されている。 したがって、/mnt1 にマウントしたRAMディスクも書き込みが
できない。 スクリプトのもっと後ろの方の、/ がリードライトで再マウント
された以降でRAMディスク化の作業をしないといけないようだ。 rc.sysinit
スクリプトを修正する。
(4-3). rc.sysinitスクリプトファイルの再修正
/ がリードライトで再マウントされた以降でRAMディスク化の作業をするように
修正する。
rc.sysinitファイルの記述の中の以下の部分に、RAMディスク化のためのコマン
ドを追記する。
# Mount all other filesystems (except for NFS and /proc, which is already
# mounted). Contrary to standard usage,
# filesystems are NOT unmounted in single user mode.
:
<--- この部分にRAMディスク化のためのコマンドを追記
:
# check remaining quotas other than root
[root@onlsbc1 rc.d]# pwd
/mnt1/etc/rc.d
[root@onlsbc1 rc.d]# ls
init.d rc.local rc0.d rc2.d rc4.d rc6.d
rc rc.sysinit rc1.d rc3.d rc5.d
[root@onlsbc1 rc.d]# vi rc.sysinit
:
# Remount the root filesystem read-write.
:
# Mount all other filesystems (except for NFS and /proc, which is already
# mounted). Contrary to standard usage,
# filesystems are NOT unmounted in single user mode.
action $"Mounting local filesystems: " mount -a -t nonfs,smbfs,ncpfs -O no_netde
v
# <-- by E.Inoue : from here
/sbin/mke2fs -q /dev/ram0 32768
#/sbin/mke2fs /dev/ram0 32768
#/sbin/mke2fs /dev/ram0 65536
mount -n -o rw /dev/ram0 /mnt1
#mount -n -o rw /dev/ram0 /mnt
#df -k
#ls -l /
#cp -ar /ramfs /mnt
cp -ar /ramfs /mnt1
#cp -ar ramfs /mnt
umount -n /mnt1
#umount -n /mnt
mount -n -o rw /dev/ram0 /ramfs
# --> to here
# check remaining quotas other than root
:
"rc.sysinit" 797L, 22718C written
[root@onlsbc1 rc.d]#
(4-4). コンパクトフラッシュ上のLinuxシステムを立ち上げる(その2)
[root@onlsbc1 inoue]# reboot
MBR部のGRUBが起動し、以下のメニューが表示された。
|
V
RAM SIZE=32MB, Red Hat Linux 7.3 (2.4.18-3)
RAM SIZE=32MB, Compact Flash Red Hat Linux 7.3 (2.4.18-3) <-- この項目
を選択
|
V
/dev/hdc1部のGRUBが起動し、以下のメニューが表示された。
|
V
32MB RAM Disk, Red Hat Linux (2.4.18-3)<--- この項目を選択
|
V
ブート処理は進んで、INITが実行され以下の状況になった。
:
INIT: version 2.84 booting
Welcome to Red Hat Linux
Press 'I' to enter interactive startup
Mounting proc filesystem: [OK]
mke2fs 1.27 (8-Mar-2002)
ramfsディレクトリからRAMディスクへのファイルのコピー、およびRAMディスク
を /ramfsへ再マウントは正常に終了した。 この直後の、
# check remaining quotas other than root
の部分で、/etc/fstabファイルが見つからないというエラーになった。
:
調べたところ、RAMディスクにコピーした後のディレクトリ構成が
/ramfs/ramfs/etc/fstab になってしまっていた。 これでは /ramfs/etc/fstab
ファイルは見つからないはずである。 rc.sysinitファイルを修正する。
[root@onlsbc1 rc.d]# vi rc.sysinit
:
cp -ar /ramfs/* /mnt1
:
[root@onlsbc1 rc.d]#
再度、システムを立ち上げる。
|
V
ブート処理は進んで、INITが実行され以下の状況になった。
:
INIT: version 2.84 booting
Welcome to Red Hat Linux
Press 'I' to enter interactive startup
Mounting proc filesystem: [OK]
mke2fs 1.27 (8-Mar-2002)
ramfsディレクトリからRAMディスクへのファイルのコピー、およびRAMディスク
を /ramfsへ再マウントは正常に終了した。 この直後の、
# check remaining quotas other than root
このの部分で表示されていた、/etc/fstabファイルが見つからないというエラー
は出なくなった。
:
Setting network parameters: [OK]
Bringing up loopback interface: execvp: No such file or directory
[FAILED]
Bringing up interface eth0: execvp: No such file or directory
[FAILED]
Starting system logger: [OK]
:
システムは立ち上がった。 コンソールからはログインしてシステムが使用でき
る。 ネットワークからはNG.
ここで一旦、システムをシャットダウンしてみる。
:
Turning off quotas: [OK]
Unmounting file system: umount2: Device or resource busy
umount: /ramfs: Illegal seek [FAILED]
INIT: no more process left in this runlevel
ここでフリーズする。 ALT-CTL-DELは利かない。 電源を切った。
(4-5). 問題点の処理
(A). システム立ち上げ時の問題点
loopback interface および eth0 interface の設定が正しくできて
いない。
(B). システム立ち下げ時の問題点
/ramfs のアンマウントが正しくできていない。
(4-5-1). システム立ち上げ時の問題点についての対策
再確認のために、RAMディスク化の処理をしていないコンパクトフラッシュの
Linuxシステムが正常に立ち上がれることを調べる。
/etc/rc.d/rc.sysinitファイルをオリジナルの状態に戻して、立ち上げてみる。
[root@onlsbc1 rc.d]# vi rc.sysinit
:
## <-- by E.Inoue : from here
#/sbin/mke2fs -q /dev/ram0 32768
##/sbin/mke2fs /dev/ram0 32768
##/sbin/mke2fs /dev/ram0 65536
#mount -n -o rw /dev/ram0 /mnt1
##mount -n -o rw /dev/ram0 /mnt
##df -k
##ls -l /
##cp -ar /ramfs /mnt
#cp -ar /ramfs/* /mnt1
#cp -ar ramfs /mnt
#echo -n $"Finished cp ar /ramfs /mnt1 and sleep 10 "
##sleep 10
#umount -n /mnt1
##umount -n /mnt
#echo -n $"Finished umount /mnt1 and sleep 10 "
##sleep 10
#mount -n -o rw /dev/ram0 /ramfs
#ls -l /ramfs
#ls -l /ramfs/etc/fstab
#echo -n $"Finished mount -n -o rw /dev/ram0 /ramfs and sleep 10 "
#sleep 10
## --> to here
:
"rc.sysinit" 817L, 23199C written
[root@onlsbc1 rc.d]#
システムをリブートする。
:
Setting network parameters: [OK]
Bringing up loopback interface: execvp: No such file or directory
[FAILED]
Bringing up interface eth0: execvp: No such file or directory
[FAILED]
Starting system logger: [OK]
:
RAMディスク化の処理をしていないのに、loopback interface、eth0 interface
設定が正常にできていない。 オリジナルのLinuxシステムを壊してしまった
ようだ。 コンソールからログインしてシャットダウンしてみる。
:
Shutting down system logger: [OK]
Shutting down loopback interface: execvp: No such file or directory
[FAILED]
Flushing all chains: [OK]
:
:
Flushing ide device: hda hdc
Power down
loopback interface のダウンでエラーだが他は問題ない。
念のために、カーネルオプションのRAMディスクサイズの指定もはずして起動し
てみたが、症状は変わらない。
256MBコンパクトフラッシュのLinuxシステムをインストールし直すことに
しよう。
(4-5-2). システム立ち下げ時の問題点についての対策
---xxxx